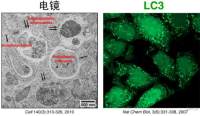

Use of HMS Genetics Confocal Microscope
互联网
startup
• Turn on the scope (switch on base, toward back, on the right).
• Turn on the mercury lamp for the scope (small white box to the left of the scope).
• Turn on the green laser (far right) by pushing the red button, turning the key to the right, and turning up the power to about 10 o’clock on the dial.
• Turn on the red laser (next to green) and the blue/scanner which is on top of the red.
• Turn on the computer (never turn any light/laser source on/off when computer is on).
logon
• [Ctl][Alt][Del]; Logon: ; Password: .
• Connect to the Cepko computer "Eye" by double clicking on the Genetics Mac Server Icon.
• Logon: ; Password: .
• Start confocal software by double clicking on the TCSNT icon.
• [aquire image] FITC/TRITC.
• NOTE: the objective on the scope must match the objective selected in the software (usually 40X).
scope
• The mercury toggle switch is the small lever in the back on the upper right.
• 40X and 100X objectives are oil imersion.
• Filter 3 is red, Filter 2 is red+green, Filter 4 is confocal.
• NOTE: for confocal scans the rod on the upper left of the eyepiece must be pulled out.
trial scan
• Set the number of sections to 1 and the number accumulated to 1 and hit the [Scan] icon.
• Set the two laser settings with the knob on the right (one is brightness and the other is contrast).
• Then set the z factor which is the verticle plane that the sections will be collected from.
• To set the start and end-point for optical sections make sure the icons are shaded (reset) then click the [begin] icon and the [end] icon.
• When all the settings are adjusted, hit [stop].
aquire image
• Reset the resolution to 1024, the number of sections to 4-8, and the accumulations or passes per section to 8-16.
• Set the view to [gallery], [tiled], [Ch1], [Ch2].
• Press the [series] icon.
saving images
• To save images they must be in [tiled][gallery][Ch1][Ch2].
• Then perform a "save as" and "export file" to its own new folder within your personal folder.
• This should give a folder with 16-32 images in it. Check a few representative files to make sure that they were properly saved.
<center> <p> </p> </center>上一篇:Single-channel Protocols and Data Analysis 下一篇:Autoradiography using Emulsion-coated Coverslips